Schlage’s F Series Handlesets are the perfect finishing touch for your exterior doors, and they are incredibly simple to install. This video walks you through each step of installation to make the process even easier.
Author: Amanda Hergenreder
Switching the Handing of a Schlage Privacy/Passage (F10/F40)
Installed your lever, but it doesn’t look quite right? The lever is probably upside down, which can be easily corrected by switching the handing. This video shows you how to switch the handing of a Schlage Privacy/Passage Lever (F10/F40).
How to Install your Schlage Privacy/Passage Lock (F10/F40)
Schlage locks make it easy for you to add safety, security and style to your home, and are incredibly simple to install. This video will show you how to install your Schlage Privacy/Passage Lock (F10/F40).
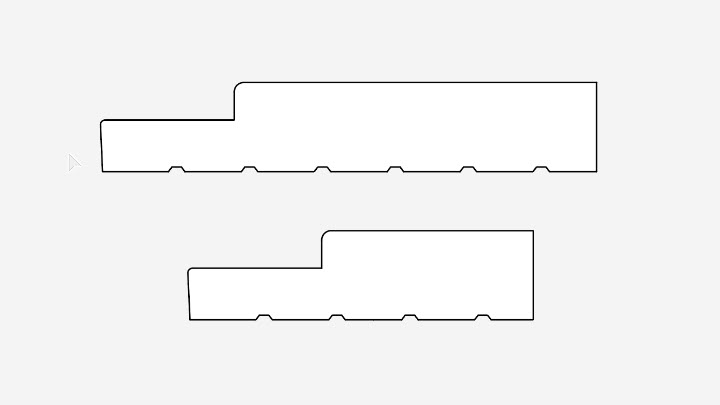
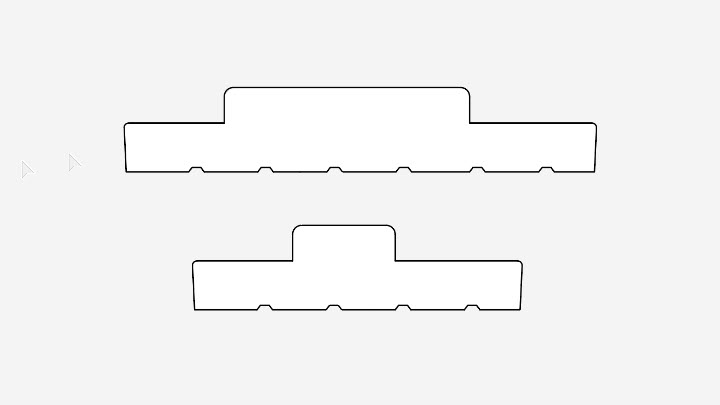
Door Backset
When using a door knob or lever, a hole will need to be bored into the stile of the door for it to be installed. The placement of the bore varies based on the door’s style or the hardware used.
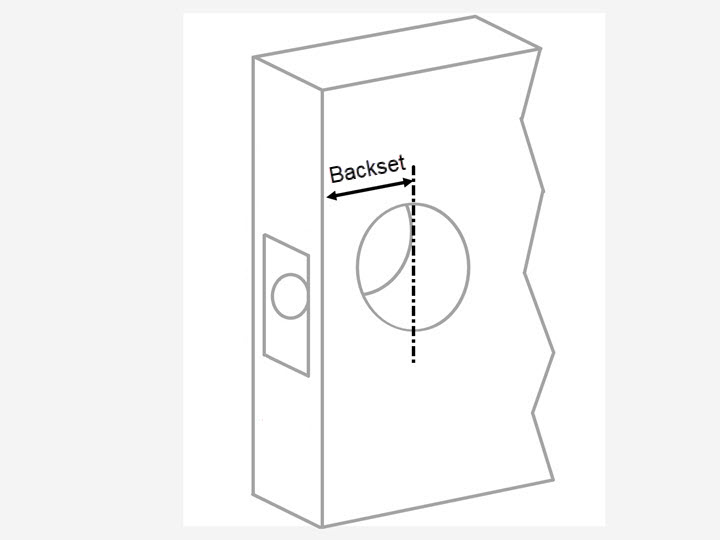

Backset
The backset is the distance from the edge of the door to the center of the bore hole. There are two common backsets for residential door locks: 2-3/8″ and 2-3/4″.
Not choosing the correct backset could mean the latches are too long or too short. Some brands of door hardware are shipped with adjustable backset latches which makes ordering easy.
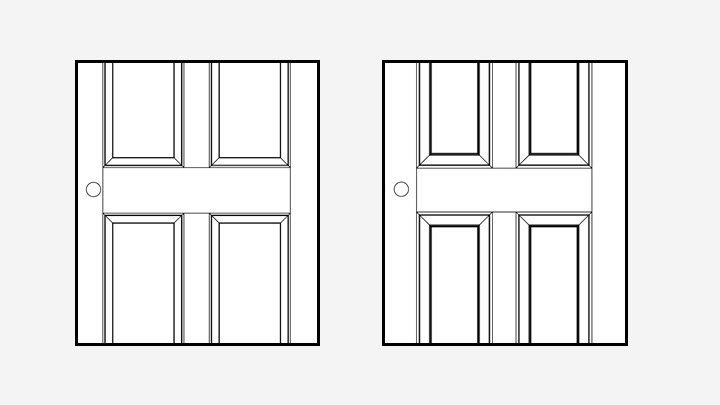
Door Stile and Backset
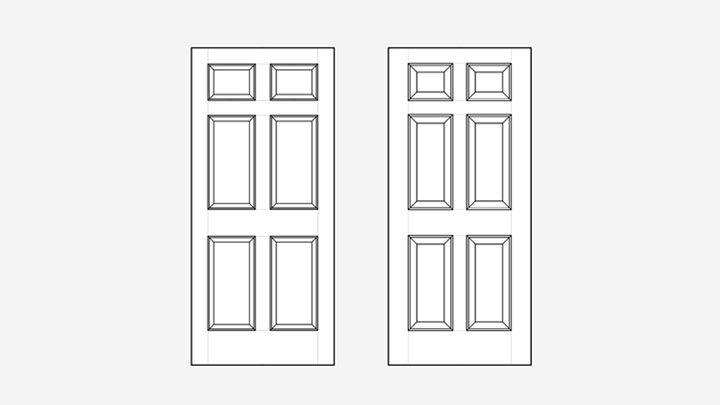
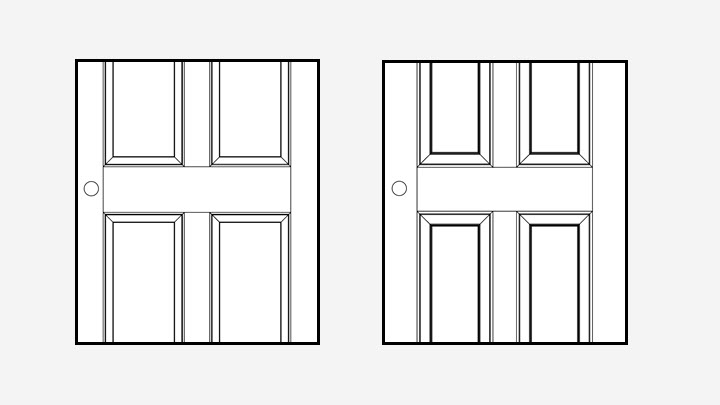
Certain door styles can only use the 2-3/8″ backset due to the width of the stile. Here are two wood doors: the door on the left is the F2130 and the door on the right is F7130. They look very similar from a layout perspective, but if you look closer the F2130 has a 4-1/2″ wide stile and the F7130 has a 5-1/2″ wide stile.
The bore is typically 2-1/8″ wide and when placing that at the 2-3/8″ backset, you can see how the bore sits in the middle of the F7130 on the right but a little off center of the F2130 on the left.
When you look at the 2-3/4″ backset, the bore is slightly off center for the F7130 on the right but it is on the stile line for the F2130.
The lockset will have an escutcheon around it, which is a piece of metal that adds a slight decoration. In the case of the F2130 and the 2-3/4″ backset, this metal component will sit over the stile line and into the rail.
Door Collections and Backset
Fiberglass Doors
Most Classic Craft have a stile that is a little over 4″ in width, so they can only have a 2-3/8″ backset. Fiber-Classic and Smooth-Star doors will have a variance in what backset they can have. Most 2/10 and 3/0 doors can have either backset while the 2/6 and 2/8 doors can only have a 2-3/8″ backset.
Wood Doors
Wood doors with a standard sized 4-1/2″ stile can only have a 2-3/8″ backset. Wood doors with a wide layout have a 5-1/2″ stile so these doors are able to have either backset option.
Interior Jamb Options
Interior doors can be pre-hung on different frame or jamb options. Sometimes the jamb availability is based on the market area. Other times it may be desirable to match an existing frame type in an older home. Below are the different jamb options for interior doors.
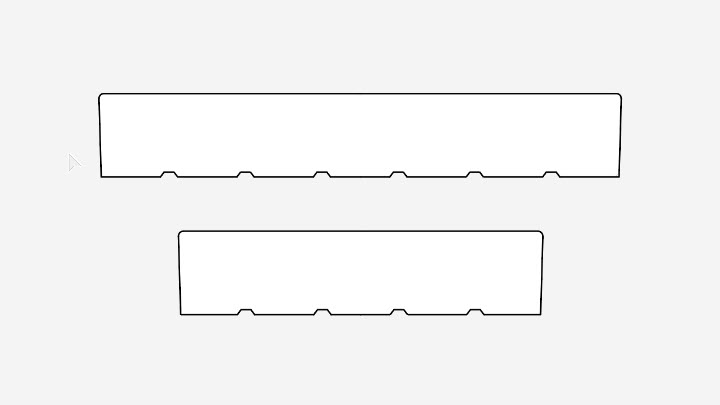
Flat Jambs
Flat jambs are just that – a flat piece of wood. The standard flat jamb is 11/16″ thick. While the jambs are noted as 4-9/16″ or 6-9/16″, their nominal sizes are 4-5/8″ or 6-5/8″.

In addition to an 11/16″ thick flat jamb, there is the 5/4 flat jamb which is 1-1/16″ thick. While the jambs are noted as 4-9/16″ or 6-9/16″, their nominal sizes are 4-5/8″ or 6-5/8″.
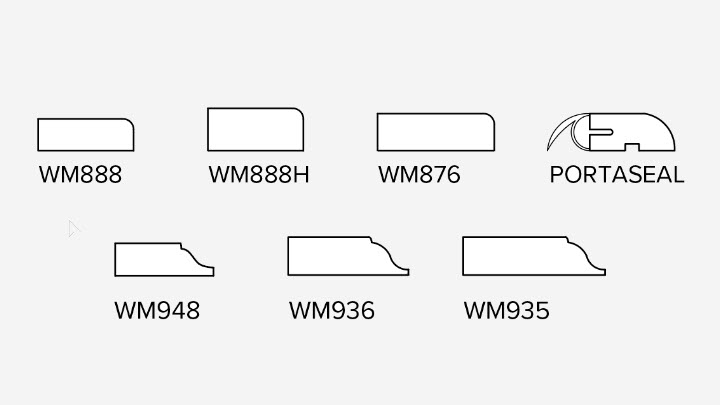
Flat Jamb Stops
Since flat jambs have nothing to stop the door, a piece of wood called a stop is added to the jamb. This prevents the door from pushing through the frame too far.
Single Rabbeted Jambs
A single rabbeted jamb has a built in stop. These frames look very similar to exterior frames. There is an option for a 1-3/8″ or 1-3/4″ rabbet to fit the interior door thickness. While the jambs are noted as 4-9/16″ or 6-9/16″, their nominal sizes are 4-5/8″ or 6-5/8″.
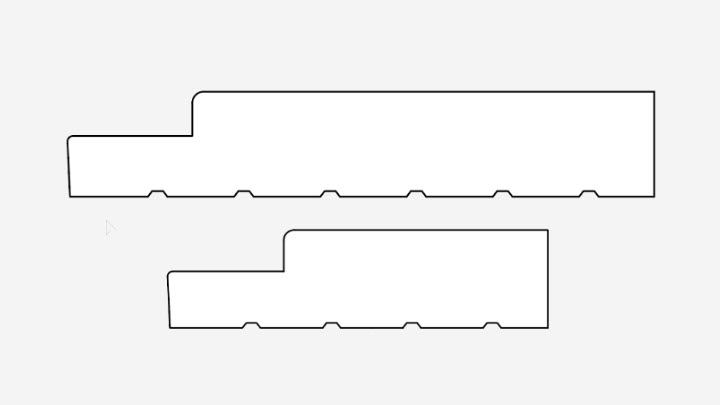
1-3/8″ Single Rabbeted Jamb
1-3/4″ Single Rabbeted Jamb
Double Rabbeted Jambs
Double Rabbeted jambs have two rabbets – one that is 1-3/8″ and one that is 1-3/4″ – so that almost any interior door will work with the jamb. While the jambs are noted as 4-9/16″ or 6-9/16″, their nominal sizes are 4-5/8″ or 6-5/8″.
Split Jambs
Split jambs are a two piece system. The frame is pre-hung together but can be taken apart for easy installation. Very often interior casing is pre-attached so after installation, the unit is complete.
Master and Grandmaster Keying
Many times for commercial buildings, the owner or landlord does not want to have a key for every unit. Instead they prefer having a master key that can provide them access to every room. In addition, there are grandmaster and great-grandmaster key options as well.
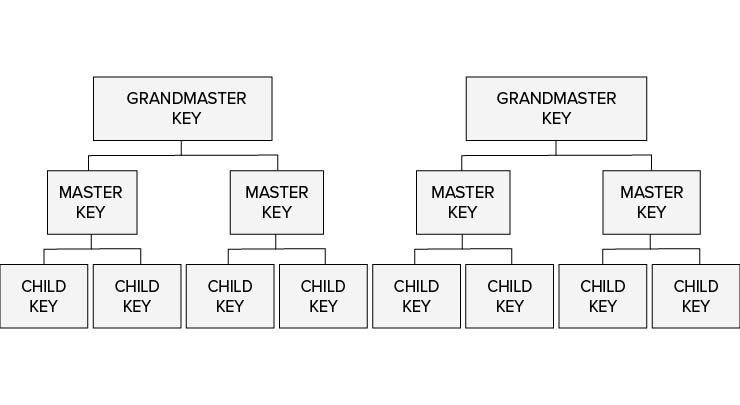
Master Key System
A master key set up is a two level system. The high level keys are called the master keys and the lower level keys are called the change keys. The change keys will only operate one lock, while the master key is able to open any of the locks.
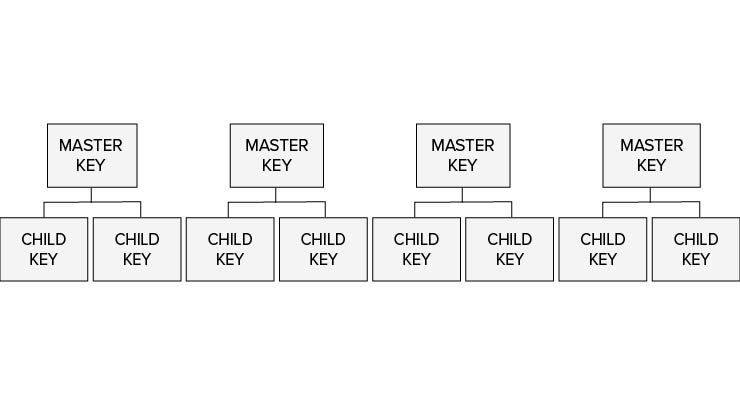
Grand Master Key System
Multiple two level systems can be joined with one key that controls them all creating a three level system. Each section has a different master key that works for all change key locks under it but the grand master key is able to open any of the change locks under any of the master keys.
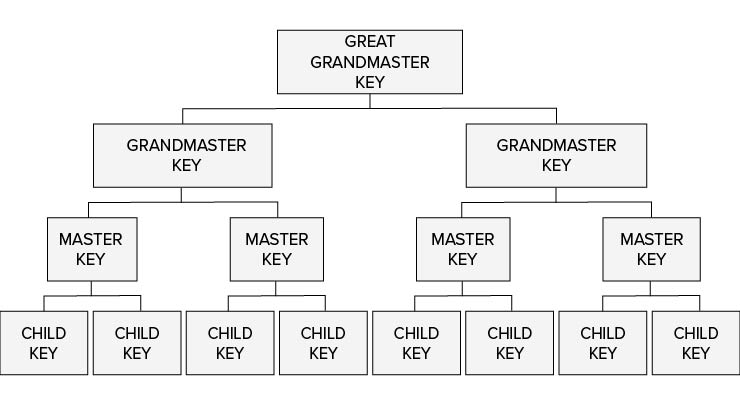
Great Grand Master Key System
Multiple three level systems can be joined with one key that controls them all creating a four level system. Two sections can be opened by one grand master key, but either of the sections including all the locks under it can be opened by the great grand master key.
Nominal vs Actual Dimensions
The idea of nominal and actual dimensions has been a consideration in the millwork industry for years.
Nominal Dimensions
The nominal dimension of a piece of lumber refers to the size of the board when it was rough cut.
Actual Dimensions
The actual dimension is the final size of the piece of lumber after it has been dried and planed.
Why Two Measurements?
When preparing a piece of wood, it is initially cut to a certain size, for example 2″ x 4″. This is the nominal measurement of the piece of wood. After cut, the wood is dried planed/smoothed, which results in the lumber shrinking slightly to 1-1/2″ x 3-1/2″. The final size of the piece of lumber is the actual measurement of the piece of wood.
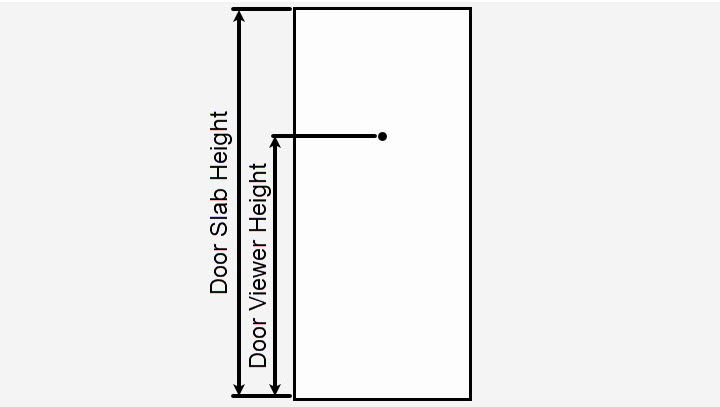
Door Viewer Location
Door viewers allow someone in the home to see outside of the home without having to open the door. This is a great way to get a view of who is visiting prior to allowing them in. There is a standard location for door viewers to be installed on a door. Craftsman style door may require a slight shift in placement in order to line up correction with the intermediate rail.
A standard door viewer sits 58″ from the bottom of the door slab. This is different than its height from the finished floor. Not every door unit uses the same sill, so by stating where the door viewer will be located in relation to the bottom of the door, there is more consistency in its placement.

In addition to the standard location, there is also the option of an ADA location. A door viewer installed at ADA height sits 48″ from the bottom of the slab.
Goldberg Privacy Latch Operation
Here’s a simple demo of the Goldberg Brothers, Inc. privacy latch, an available accessory for their barn door track hardware.
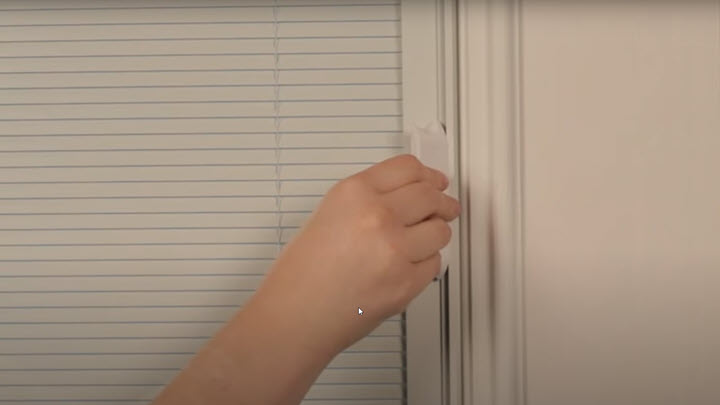
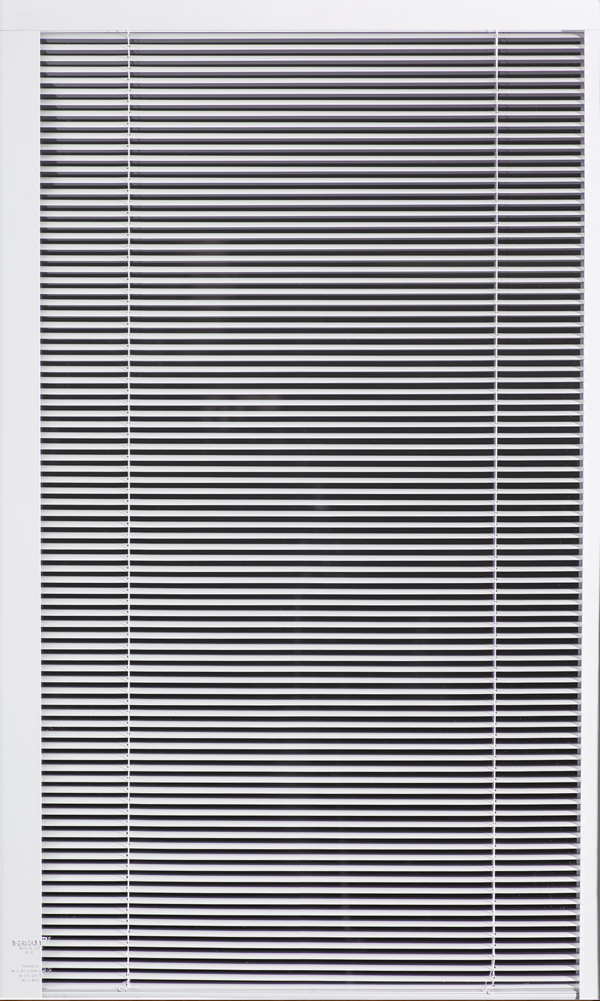
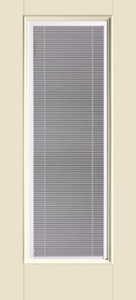
Internal Blinds
Enjoy the privacy and convenience of blinds without dangling cords or the hassle of dusting.
Protected between two panes of tempered glass for enhanced safety and performance, internal blinds are a kid- and pet-friendly choice.
You control the level of light and privacy with a simple handle that opens, closes and tilts the blinds.
Built-in privacy bars eliminate visibility into or out of your home, while helping to reduce sun glare.
The Operator
The operator is the piece that helps the blinds move up and down. There are two types of movements. A slight movement will tilt the blinds open and closed. A large movement will make the blinds raise and lower.

The operator runs along a track that is located next to the glass. The glass, therefore, is slightly offset to one side.
From the exterior, as seen in the door image on the left, the glass is shifted slightly to the right.
From the interior, as seen in the door image on the right, the glass is shifted slightly to the left.
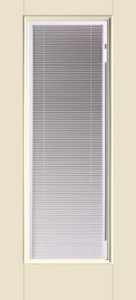
Because the operator needs to move freely up and down uninhibited, it is not possible to attach SDLs to the door. The ends of the SDL bars are machined in a way to interact with either the lip lite around the glass or the edge of the door in the case of a flush-glazed door. If the bars were installed in this way, the operator would not be able to move up and down.


Troubleshooting
Below are three common issues and how to correct them.
If the blinds are uneven, raising and lowering the blinds several times usually corrects the issue.
If you are having issues raising and lowering the blinds, you may need to realign the track magnet. To do this, slide the operator along the entire length of the track; you will hear a click when the magnet realigns. To test if the magnet realigned properly, lower the operator to the bottom of the track and slowly raise it; the blinds should operate normally.
If the operator comes disengaged from the track, it needs to be reattached. Place the right outer edge in the track with the operator at an angle. Keep the edge in the track then rotate the operator towards the glass to lock the handle in the track.